ISO 11146 Beam Quality Assessment: Complete Evaluation Guide
Key Takeaway
ISO 11146 defines the standardized framework for evaluating laser beam quality. A proper assessment requires M² measurement via caustic scan, BPP cross-validation, and power density profile classification (Gaussian, flat-top, or ring). For industrial cutting lasers, M² < 1.5 passes precision-grade criteria, while M² < 2.5 is acceptable for general fabrication per most OEM specifications.
This guide provides a structured, reproducible workflow for evaluating laser beam quality per ISO 11146 standards. Whether you're performing incoming inspection on a new laser source, validating post-maintenance beam quality, or qualifying a supplier — this assessment framework ensures objective, comparable results. For the underlying measurement procedure, see our M² Measurement Tutorial. To understand beam quality fundamentals, start with the Beam Quality Guide.
1. ISO 11146 Framework Overview
ISO 11146 is a three-part international standard governing the measurement and characterization of laser beam properties. For beam quality assessment, the most relevant parts are:
Stigmatic and simple astigmatic beams. Defines beam width (D4σ method), divergence angle, beam propagation ratio M², Rayleigh length, and beam waist parameters. This is the primary standard for fiber and CO₂ laser beam quality.
General astigmatic beams. Extends Part 1 to beams with independent X and Y behavior (M²x ≠ M²y). Required for diode lasers and some disk laser systems with non-circular beam profiles.
Intrinsic and geometrical classification. Provides methods for characterizing beam propagation that are independent of the measurement coordinate system. Used for advanced beam characterization in R&D applications.
2. Assessment Criteria & Pass/Fail Thresholds
While ISO 11146 defines how to measure, pass/fail thresholds are typically set by the laser manufacturer, the end user, or industry-specific standards. The following table summarizes widely adopted acceptance criteria for industrial laser systems:
| Application Grade | M² Threshold | BPP (mm·mrad) @1064nm | Typical Laser Type | Use Cases |
|---|---|---|---|---|
| Precision Grade | M² ≤ 1.2 | ≤ 0.41 | Single-mode fiber | Thin-sheet cutting ≤3mm, micro-machining, medical devices |
| Production Grade | M² ≤ 1.8 | ≤ 0.61 | Low-mode-count fiber | General sheet metal 1-12mm, moderate precision |
| Industrial Grade | M² ≤ 2.5 | ≤ 0.85 | Multimode fiber, disk | Thick plate ≥12mm, welding, general fabrication |
| High-Power Grade | M² ≤ 5.0 | ≤ 1.70 | High-power multimode | 20-50mm thick plate, cladding, heat treatment |
- M² within manufacturer specification ± 10%
- M²x / M²y ratio < 1.15 (circularity check)
- Beam pointing stability < 50 μrad over 30 minutes
- Power stability within ± 2% of set value
- No secondary lobes exceeding 5% of peak intensity
- M² exceeds spec by > 15% → optical contamination or damage
- Asymmetric beam (M²x / M²y > 1.3) → fiber connector misalignment
- Significant intensity side lobes → higher-order mode content
- M² increasing over time → thermal lens or pump degradation
- BPP and M² inconsistent → measurement error, repeat test
3. Step-by-Step Assessment Workflow
A complete ISO 11146 beam quality assessment follows a structured 6-phase workflow. Total assessment time is typically 60-90 minutes for a trained operator using automated equipment, or 2-4 hours with manual setups.
- Allow laser to warm up for ≥30 minutes at operating power
- Verify ambient temperature 20-25°C, humidity < 60%
- Clean all optical surfaces (output window, collimator, focusing lens)
- Record laser serial number, operating hours, and power setting
- Calibrate beam profiler with reference source if available
- Measure output power with calibrated power meter
- Record power stability over 5 minutes (should be ± 2%)
- Verify power matches specification within ± 5%
- If power deviates > 10%, abort assessment — laser needs service
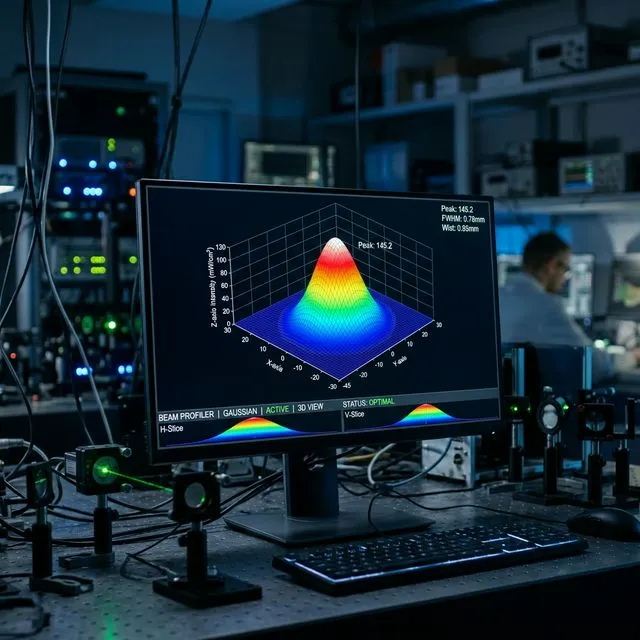
- Perform ISO 11146 caustic scan (10+ positions, D4σ method)
- Fit beam width² vs. position to hyperbolic curve
- Record M²x, M²y, and effective M² = √(M²x × M²y)
- Repeat 3× and verify reproducibility within ± 5%
- See our M² Measurement Tutorial for detailed procedure
- Capture 2D intensity profile at beam waist
- Classify as Gaussian, flat-top, ring, or multi-mode
- Measure beam ellipticity (1.0 = perfect circle)
- Check for side lobes or secondary peaks (< 5% of peak)
- Calculate BPP from measured beam waist and far-field divergence
- Compute M² from BPP: M² = BPP / (λ/π)
- Compare with directly measured M² — deviation should be < 8%
- If deviation > 15%, review measurement setup for errors
- Generate assessment report with all measured values
- Compare results against acceptance criteria (see Section 2)
- Record pass/fail/conditional status
- Archive beam profile images and raw measurement data
- Schedule next assessment (recommended every 2,000-5,000 operating hours)
4. Power Density Profile Assessment
Beyond the scalar M² value, understanding the spatial distribution of power density is critical for predicting cutting and welding performance. ISO 11146 characterizes the intensity distribution at the beam waist, which can be classified into distinct profile types:
Gaussian (TEM₀₀)
Characteristics: Bell-shaped profile with peak intensity at center. M² ≈ 1.0-1.2. Ideal for precision cutting and fine marking.
Assessment: Peak-to-mean ratio should be ≈ 2.0. 1/e² width and D4σ width should agree within 5%.
Flat-Top (Top-Hat)
Characteristics: Uniform intensity across beam cross-section. Created by beam shaping optics. M² = 1.5-2.5 typical.
Assessment: Intensity uniformity should be ± 10% across 80% of beam area. Edge rolloff should be < 15% of beam diameter.
Ring (Annular/Donut)
Characteristics: Ring-shaped profile with lower or zero center intensity. Common in variable beam shape lasers (ARM, BrightLine). M² = 2.0-5.0.
Assessment: Measure inner/outer ring diameter ratio. Center-to-ring intensity ratio indicates mode purity.
Beam ellipticity e = D_min / D_max measures how circular the beam is. Perfect circle = 1.0. For industrial cutting, e > 0.90 is required. Asymmetric beams with e < 0.85 produce direction-dependent cutting quality — cuts along one axis will differ from cuts along the other.
5. BPP and M² Cross-Validation Method
Cross-validation between Beam Parameter Product (BPP) and M² provides a powerful check on measurement accuracy. These two metrics are mathematically related, so independent measurement of each should yield consistent results. Discrepancies indicate measurement errors.
- Measure M² directly via caustic scan (Phase 3)
- Independently measure beam waist w₀ and far-field divergence θ
- Calculate BPP = w₀ × θ
- Compute M² from BPP: M²_calc = BPP × π / λ
- Compare M²_direct vs M²_calc
- Deviation < 8% → measurements validated
- Deviation 8-15% → review setup, repeat once
- Deviation > 15% → systematic error, investigate
6. ISO 9013 Cutting Quality Correlation
Beam quality directly impacts achievable cutting quality per ISO 9013 standards. Understanding this correlation helps set appropriate M² acceptance criteria based on the cutting quality your applications require.
| M² Range | Typical ISO 9013 Range | Thickness Range | Edge Quality |
|---|---|---|---|
| M² ≤ 1.2 | Range 1 achievable | 0.5-6mm | Smooth edge, minimal striation, Ra < 6.3μm |
| M² = 1.2-1.8 | Range 1-2 typical | 1-12mm | Good edge quality, fine striations, Ra 6.3-12.5μm |
| M² = 1.8-2.5 | Range 2-3 typical | 3-25mm | Moderate edge quality, visible striations, Ra 12.5-25μm |
| M² = 2.5-5.0 | Range 3-4 | 12-50mm | Rough edge, deep striations, Ra 25-50μm |
7. Beam Parameters → Cut Quality: Causal Mechanisms
The correlation table above maps M² ranges to ISO 9013 quality classes, but understanding why each beam parameter affects cutting quality is essential for troubleshooting and process optimization. Below are five causal chains that connect measurable beam characteristics to observable cutting outcomes.
Physics: Focus spot diameter d₀ = 4M²λf / (πD), where f = focal length and D = raw beam diameter. Depth of focus DOF ∝ d₀² / M². Higher M² produces a larger spot that diverges faster, so the beam defocuses before it exits thick materials. On 20mm mild steel, increasing M² from 1.5 to 3.0 typically increases kerf taper from 0.05mm to 0.15mm — enough to shift from ISO 9013 Range 2 to Range 3.
Key insight: Gaussian beams produce the smoothest cuts in thin materials (<6mm), but flat-top profiles can outperform Gaussian on thick plates (>15mm) because their uniform energy distribution creates more controlled melt flow along the full kerf depth. This is why some high-power systems (Trumpf BrightLine, IPG AMB) offer switchable beam profiles.
An elliptical beam (e < 0.90) cuts differently depending on the cutting direction. The kerf is wider when cutting along the beam's major axis and narrower along the minor axis. This creates a systematic geometric error that cannot be corrected by adjusting cutting parameters — only beam alignment or optics replacement resolves it.
BPP (Beam Parameter Product) sets a hard physical limit on the smallest focus spot achievable with any optics. This directly determines the minimum detail size: internal corners, small holes, and narrow slots. Lower BPP = finer features.
| BPP (mm·mrad) | Min. Spot (150mm lens) | Min. Hole Ø (in 1mm steel) | Typical Applications |
|---|---|---|---|
| ≤ 0.4 | ≤ 20μm | 0.2mm | Micro-cutting, stent manufacturing, electronics |
| 0.4-0.7 | 20-35μm | 0.5mm | Sheet metal parts, HVAC, enclosures |
| 0.7-1.5 | 35-75μm | 1.0mm | Heavy plate, structural steel, shipbuilding |
Even with perfect M² and profile, beam pointing instability causes the focus spot to wander relative to the programmed path. This is especially critical for precision parts where contour tolerance is ±0.05mm or tighter.
Pointing stability is measured in μrad (microradians) over 30 minutes at operating power. For a 200mm focal length lens, 50 μrad pointing drift translates to 10 μm displacement at the focus — negligible. But 500 μrad (not uncommon in failing pump modules) creates 100 μm = 0.1mm wandering.
Practical application: When cutting quality degrades, use these causal chains as a diagnostic framework. Measure the beam parameters, identify which chain explains the symptom (taper? roughness? dimensional error?), and target the root cause rather than adjusting cutting parameters blindly. Use our Beam Quality Analyzer to quantify your beam and map it to expected cutting performance.
8. Assessment Report Template
A standardized assessment report ensures consistent documentation across assessments. The following template covers all essential parameters and can be adapted to your organization's quality management system:
- Laser manufacturer, model, serial number
- Operating hours at time of assessment
- Nominal power, wavelength, fiber core diameter
- Date of last maintenance/service
- Operating power during test
- Warm-up time, ambient temperature, humidity
- Measuring equipment model and calibration date
- Focusing lens focal length used
- M²x, M²y, M²_effective
- BPP (mm·mrad)
- Beam waist w₀ (mm), divergence θ (mrad)
- Beam ellipticity, profile type
- Power output and stability
- Pass / Fail / Conditional status
- Comparison to manufacturer spec
- Comparison to previous assessment (trend)
- Recommended next assessment date
- Corrective actions if applicable
Frequently Asked Questions
How often should beam quality be assessed?
For production cutting systems: every 2,000-5,000 operating hours, or whenever cutting quality degrades unexpectedly. For research or precision applications: every 500-1,000 hours. Always reassess after fiber connector cleaning, optics replacement, or any maintenance involving the beam delivery system.
What causes M² to degrade over time?
Common causes include fiber connector contamination (most frequent), thermal lens effects in delivery fiber, pump diode aging, back-reflection damage to fiber end face, and protective window contamination. Quality fiber lasers typically maintain M² within ± 5% over 100,000+ hours with proper maintenance.
Can I assess beam quality without a beam profiler?
Not per ISO 11146. However, a practical shop-floor indicator is the “burn test”: fire a short pulse at acrylic or thermal paper at the focus. Asymmetric or irregular burn patterns indicate beam quality degradation. This is a screening tool, not a measurement. For quantitative assessment, a beam profiler is essential.
What is the difference between ISO 11146 and ISO 9013?
ISO 11146 characterizes the beam itself (M², BPP, divergence), while ISO 9013 classifies the cut result (edge quality, perpendicularity, roughness). Beam quality assessed per ISO 11146 is one of many factors that determine the achievable cutting quality per ISO 9013.
Related Guides
Reference: ISO 11146-1:2021, ISO 11146-2:2021, ISO 11146-3:2004. Assessment thresholds based on IPG Photonics, Trumpf, nLIGHT, and Raycus published specifications (2024-2026). Always verify acceptance criteria against your specific laser manufacturer's datasheet.